How I create object overrides:
First of all, I couldn’t have figured out how to do any of this if it weren’t for melbrewer. She guided me to this thread over at MTS. All of the instructions in this tutorial come from plasticbox. I felt like it might be easier for people to follow a tutorial w/ pics and longer explanations, so I made this to save others some of the frustration I had when I first tried to figure everything out. Here we go 🙂
Step 1:
Go into the game and find the name of the object you want to recolor. Make a note of it.
For this tutorial, I’ll choose “Puppet Theater Curtain” because it only has one IMG file to replace.
Step 2:
Go to this page:
http://sims-4-files.wikia.com/wiki/Strings_ENG_US
*Remember that there are two pages of strings, so if you don’t find your object on the first page go to the second one and search:
http://sims-4-files.wikia.com/wiki/Strings_ENG_US_Part2

On these pages you will be able to find the string name for the object you want to recolor.
If you are using Google Chrome you can click on the 3 bars in the upper right corner and choose “find,” then type the name of the object and it will take you right to it. That way you don’t have to scroll and search forever.
*Melbrewer helpfully suggested I add that in any browser on a Windows computer you can hit Ctrl+F and a search box will open in the browser and you can type in the name there and it will find it on the page for you.

As we can see in this screenshot, the string for “Puppet Theater Curtain” is
<Text Key=”3B0AF0D2″>Puppet Theater Curtain</Text>
Step 3:
Open S4PE. Choose “Open.” Within S4PE go to your program files and find the “data” folder inside the Sims4 folder. Then open the “client” folder (my path looks like this C:\Program Files (x86)\Origin Games\The Sims 4\Data\Client). Open “ClientFullBuild0”
*Important! Make sure you open “ClientFullBuild0” and not “ClientDeltaBuild0,” they are easy to confuse and “ClientDeltaBuild0” comes first.

Step 4:
Once your “ClientFullBuild0” is open in S4PE, click “Tools” and choose “Search”
Copy the number that’s in quotations in your string into the top search bar. In our case it’s 3B0AF0D2. Add a 0x in front of your number. So you should have 0x3B0AF0D2 in your search bar. Then click on “Enable Filter” and choose COBJ 0x319E4F1D from the drop down list.

Click search.
Your search results should look like this:

Highlight the first entry (you can actually choose any file in the list and it will get you where we’re headed) in the list and click “Go to” You should see this:

After you see your COBJ that you highlighted, click on the Instance column to organize the list the way we need. Right underneath the highlighted COBJ file, you should see a OBJD file with the same instance number.
(With certain objects, the OBJD file isn’t right under the COBJ file, but it should be very close to it. I found this out while looking for rugs)
Click in the OBJD file line. It should show a list of text to the right like in the following pic.

In the text block on the right you should see a line that says
— TGIBlockList: Model (0x1) —
[0]: 0x01661233-0x00000000-0xDC22747C5A113A13
Copy and paste the 0xDC22747C5A113A13 into the “Instance” box at the bottom of S4PE. Then click the checkbox before the “Instance” box. Then click “Set, ” then click “Filter active.”
A screen like this should come up.

Click on the MLOD file that has a group of 0x00000000.
In the right hand text box there are “Chunk Entries.” We want the “Chunk Entries” that say “Shader:_____Phong” near the top. Scroll down until you find one like this:

We want the one that says “Diffuse Map”
For our curtain that is:
[0F]: Field: 0x6CC0FD85 (DiffuseMap); Key: 0x00B2D882-0x00000000-0xDC58F3816E69CA44
So 0x00B2D882-0x00000000-0xDC58F3816E69CA44 is the texture we want.
Highlight and copy the 0xDC58F3816E69CA44 part of that number.
Close the current open file in S4PE.
*there are chunk entries for each of the curtain recolors in the text list. We only need one of them because as soon as we find that one all the others will be right next to it.
If you are recoloring something like a bed, there will be more chunk entries listed under various “Shader:_____Phong”s that you will need to find. Find however many of them start with a different series of numbers. The Single Mission bed has 4 chunk entries I had to find to find all the IMG texture files. This also meant that I had to search through Full Client builds 6, 7, and 8 to find them all.
Just to be safe, scroll through all the “Shader:_____Phong” entries and make sure all the diffuse map files start with the same series of numbers/letters (except for the last few numbers/letters in each instance number), if they do, they will all be together, if they don’t you need to make note of the different number/letter series (I use notepad) so you can find them all.
Step 5:
*I’ve found that most of the object IMG files I’ve tried to find are in “ClientFullBuild7” or “ClientFullBuild8,” but they aren’t all there, I believe there are some IMG files in “ClientFullBuild6,” and “ClientFullBuild0,” and maybe some of the others.
Open “ClientFullBuild7”
You can paste the 0xDC58F3816E69CA44 instance number in the instance box, click the box to the left of it, click set, and then click “Filter active.” (or you can just scroll until you find the right number, it doesn’t take long)

In the case of our curtain, it worked because that IMG is in “ClientFullBuild7”. If nothing comes up, you can close “ClientFullBuild7” and open “ClientFullBuild8” and search there, etc.
Step 6:
Now we need to save our IMG files so that we can open them in Photoshop.
I create a new folder on my desktop named “whatever the object name is,” in this case, “PuppetTheaterCurtain,” and save the files there so I don’t get confused.
If I click on Export/Import via helper first, it doesn’t carry the name of the file with it. Because I don’t want to have to type all those numbers and letters out, I right click on each texture file (there are 9 for the curtain and they all have the same instance number except for the last 3 letters/numbers) and choose “Export” and then “To file”. After I’ve done this for all the IMG files I need, I go back and click on “Export/Import via helper” for each file. Then I can just replace the previously exported file with the “exported via helper” file for each texture and it will be in the right format and have the right name. We have to “Export/Import via helper” because just “Exporting to file” doesn’t create an openable dds file.
Here’s a pic to try to help explain, maybe it will help

There’s probably a better way to do this, but this is my first time using SPE in any form and I’m pretty much a newbie. Perhaps you guys already know a better way or can figure one out 🙂
*You could just rename the file to reflect whatever the texture is, but then when you repackage it you would have to do a few more steps instead of just importing the file and I don’t do it that way so I’m not much help. If you want to do it that way melbrewer367 shows how on her tumblr.
Step 7:
Go to the folder on your desktop that you created and saved your IMG.dds files to. Open one of the files in photoshop (or whichever paint program you use) and recolor it. Save it with the same name it already has.
(When I first start, I open all the textures of the object in Photoshop and then save them all as PSDs with the word “orig” added to the end of the file name. Then I go back into the folder that contains the textures and move all the original DDS files into a file called “Originals” and they never get edited or touched, that way I have them if I need them. Also, after I’m done editing, I can just save as a DDS into the main folder and all my recolors are right there where I need them and I don’t accidentally replace the originals.)
New Step 8 (added 12/4/14) thanks (again!) to melbrewer and plasticbox:
When all your textures are saved and ready, open S4PE and highlight and drag the all the dds files you saved in your project folder onto the main window.
A window like this will pop up:
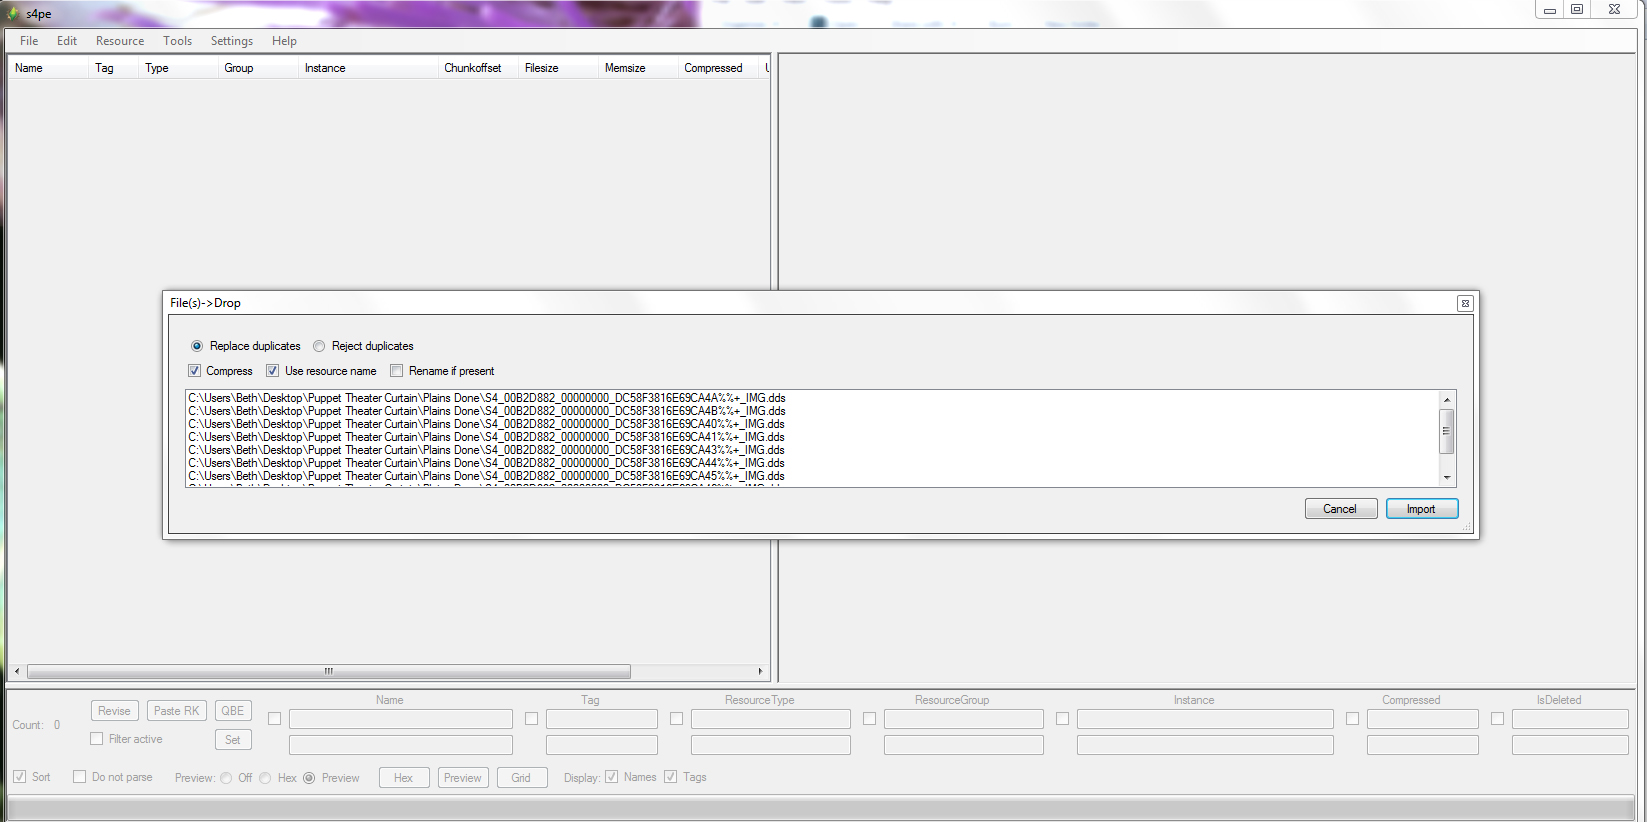
Click Import. All the dds files will then be in S4PE. All you have to do then is click “File” and then “Save as” and save the file with the file name you want.
Like here:
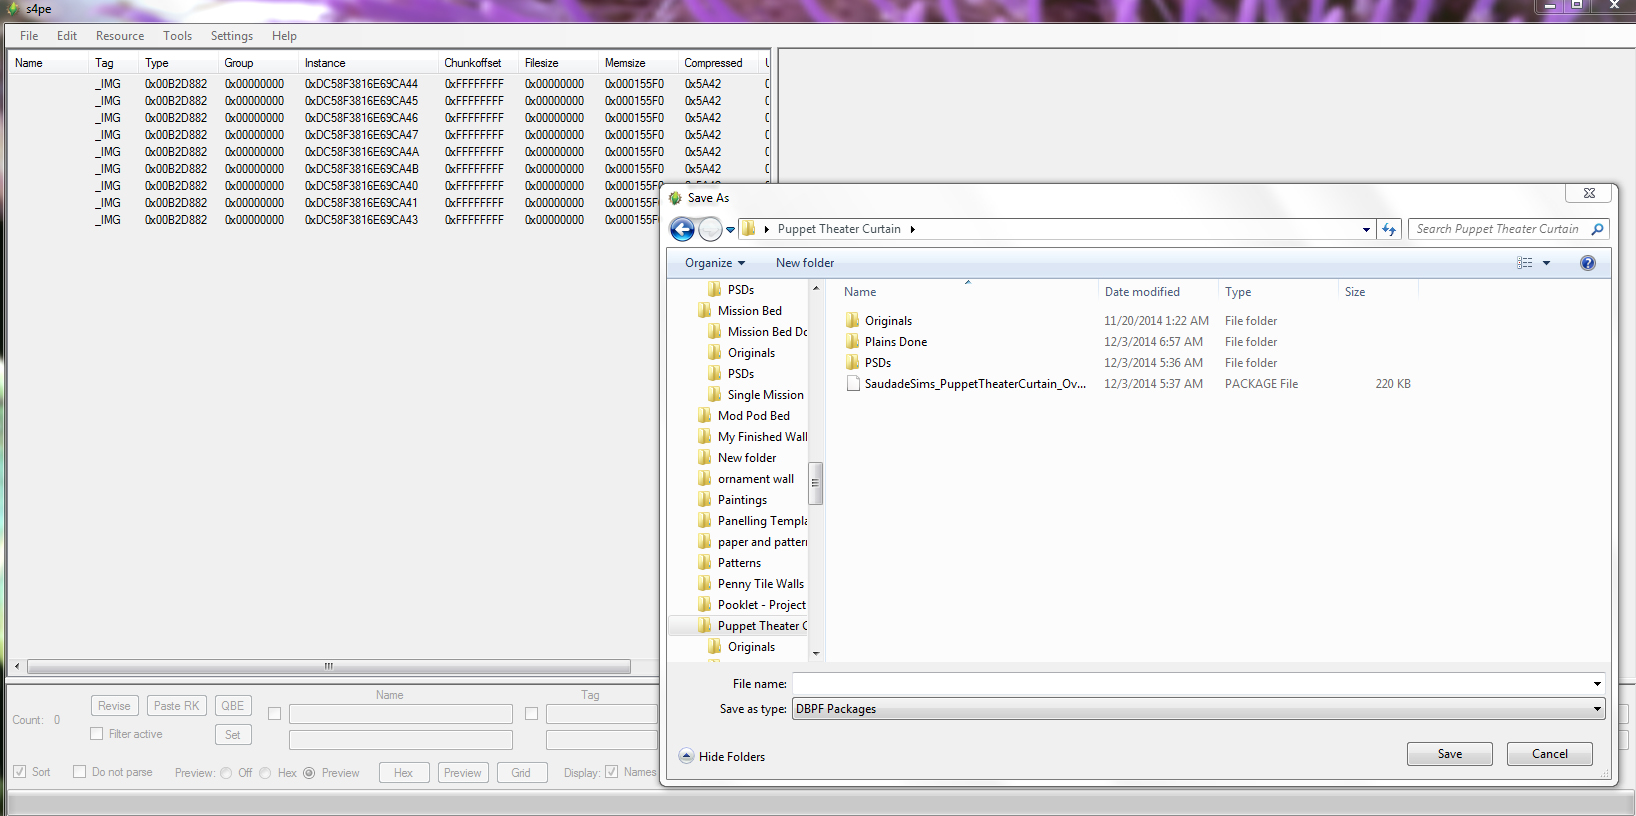
Voila! Your recolors/overrides are done and packaged up. The new package file you made will override the base game textures. Place it in your “Mods” folder and enjoy your new textures!
*you can only make as many recolors as the objects has originally. For instance, because our curtain has 9 color options, we can only have 9 custom overrides. The recolors you make will replace the original texture and become a default override
Here’s a quick override I did of the red curtain:

Please, please let me know if you have any questions. I’ve never tutorialized before and I might be confusing in some places. I know this can be confusing, don’t be afraid to ask if you need help!
*The info below is out of date, please see the new step 8 above instead 🙂
Go back to S4PE and find the IMG file for the texture you recolored. Right click on it and choose replace:

Double click on the file in your folder that you recolored (it should have the exact same name as the one you are replacing). You should then see a preview of your recolor in the right hand side of S4PE.
Choose “File” and then “Save” and wait for S4PE to save the file. After it’s done, close the program.
Start up your game and enjoy your new recolors!

Hello,
First of all, I want to thank you, the tutorial is amazing and I was expecting it for so long ♥
But I’m having a problem to recolor. I’m trying to recolor wall posters, and there’s no OBJD file with the same instance code as COBJ 😦 so idk what to do, has it happened to you? :((
LikeLike
Which wall poster? Can you tell me the name of it? I’ll see what I can find. It hasn’t happened to me that I haven’t found the matching OBJD file yet.
LikeLike
it was the one called “dramatic cooking poster”, but fortunately I could solve the problem \o/ thank you very much for the attention sweetie
LikeLiked by 1 person
Hi! I don’t have the english language, I cannot do anything?
LikeLike
I’m not sure what you are asking me here. I’m sorry.
LikeLike
This doesn’t work for me after Step 6. For some reason in s4pe the option Export/Import via helper doesn’t bring up any options to export/import/save and close the file. Its just blank at the bottom of the open screen.
LikeLike
Which version of s4pe are you using? Did you extract your S4PE with 7zip instead of unraring it? Not using 7zip to extract can cause this problem.
LikeLike
Thank you for this. You rock! I am looking forward to improving my game by improving the beds, curtains, rugs, and especially the artwork. Now things can actually match.
LikeLike
You’re so welcome. I’m on a recoloring spree! lol
LikeLike
Hi, I have the same problem as Tatiana B. Everything was fine (I used the same string you used) but in this step: “Click on the Instance column to organize the list the way we need. Right underneath the highlighted COBJ file, you should see a OBJD file with the same instance number” I’ve found that I didn’t have an OBJD with the same instance number as the COBJ file.
The S4PE is 0.2.d and I’ve open it with 7zip.
Do you know why?
Thanks for your time and work
LikeLike
ok, it was me… I’ve opened “ClientDeltaBuild0” instead of “ClientFullBuild0”. Now it works! Thanks a lot
LikeLike
lol, I’ve done that so many times! I’m glad you figured it out and told me what happened! I’ll add a part to the tutorial that warns people about it.
LikeLike
I know this is probably such a lame question, but how do you even open s4pe? I downloaded it, but all that pops up is zip files with nothing to run or install inside, just random .dll and .txt files. o.O I’ve never attempted making any CC for the sims even tho i’ve played for years. your tutorial is great and i’d love to try making some recolors!
LikeLike
It doesn’t install itself as a program on your computer. Make absolutely sure that you have 7zip installed and use it to extract S4PE. If you use Winzip or Winrar the program won’t work correctly.
Once you have it unpacked, there will be a folder on your desktop or where ever you unpacked it to called “s4pe.0.3.a.” Open that folder. Double click on the file that says “sp4e” in the name column and says “application” in the type column.. This should open the program. You can create a shortcut to it by right clicking on it the application file and choosing “create shortcut” and place the shortcut on your desktop for easier use.
I hope that helps! Let me know if that doesn’t work for you or if you have any more questions 🙂
Oh, and it isn’t a lame question, I had to fiddle around with s4pe quite a bit to get it to open, too.
LikeLike
Mate, awesome stuff, Ive got a bit of texture tweaking to finish off but I have got a fridge out and back in no problem at all. Than you so much for taking the time to share what you have learned.
LikeLike
Wow, I really appreciate your feedback:) I’m so glad my tutorial helped you. I’d love to see what you’ve created!
LikeLike
Hi saudadesims! Thanks so much for the tutorial 🙂 I have just made my first painting recolor and put it in my game. The textures show up correctly; however, the preview in buy mode still shows the old textures. Is that usual or have I missed something? It was the Superassymetry painting that I recolored.
Thanks!
kitkat
LikeLike
The thumnail will still show the originals colors even after you replace the textures. You would have to follow another tutorial, the link to which I will place here as soon as I am able to find it 😉
LikeLike
Here’s the link to the tutorial 🙂 http://m1ssduo.tumblr.com/post/98810892163/hi-guys-just-here-to-share-a-little-guide-on-how
LikeLike
Hi. Thanks for the awesome tutorial. I’m having the same problem from step 6. The helper is blank at the bottom and when i open the file in photo shop its just a black square. I have Winrar and 7Zip installed yet when I extract the s4pe files using 7Zip it still doesn’t want to work.
LikeLike
I’ve tried everything, even uninstalled Winrar and worked only with 7Zip but still having the same problem. The export/Import helper is still coming up blank with no options at the bottom to Save/Import/Export, as a result I’m unable to open the IMG file in Photoshop. Very frustrating indeed. I’ve downloaded the latest version of s4pe over and over again but still no bug fix. 😦
LikeLike
I’m sorry you are having these issues, Kym! When I first started using S4PE I had the same problem. Try downloading the 0.2.C version of S4PE at this link: https://github.com/Kuree/Sims4Tools/releases/tag/0.2c and unpack it with 7zip. See if that version will allow you to export as DDS. Let me know if that doesn’t work, okay?
LikeLike
Thanks so much for your response. Sorry I commented twise lol I didn’t think the first comment went through. New at this. I have since downloaded version 2 and I’m using version 3 aswell if that makes sense. But I have got it right. Thank u so much for your tutorial and for your help. 🙂
LikeLike
Sorry to bug u again. I’m trying to recolor the single mission double bed but can’t figure out how to recolor the bedding all I get right is the bottom frill and then the wood itself lol. Your help is much appreciated. 🙂
LikeLike
Thanks for this! I tried making some new textures for one of the rugs last month-ish and gave up. I needed pictures, lol.
LikeLike
You’re so welcome! Love your cc!
LikeLike
[…] Off on Sims 4 CC Creating Default Overrides for Objects in The Sims 4 by SaudadeSims Visit […]
LikeLike